Are you planning to buy a digital camera? Maybe you want to give yourself a gift with this kind of equipment so that you can discover and learn more of the art of digital photography. A hobby you really wanted to do wherein you can play with your camera to capture a desired image. But with all the cameras available in the market, it is very confusing to choose the suitable one for a beginner.


A Digital Single-Lens Reflex camera, or what we commonly call DSLR, is a type of digital camera that usually has detachable lenses, a reflex mirror, and a digital camera back that replaced the photographic film.
The reflex design scheme is the primary difference between a DSLR and other digital cameras. In the reflex design scheme, light travels through a single lens and a mirror is used to reflect a portion of that light through the viewfinder - hence the name Single Lens Reflex. The image that is seen through the viewfinder is also the image that is captured by the camera's sensor.
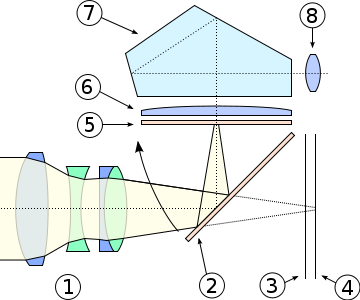
Cross-section view of a DSLR. Electronics and display not shown.
DSLRs have better image quality than the common Point-and-Shoot cameras and allow you to manually adjusts settings before taking a picture. There are hundreds of DSLR cameras in the market today, and the criteria in choosing the best is usually based on lens, sensor, resolution, and speed. But price is also one aspect to consider. You might find models amounting as much as $3,000. That is too expensive for an average user. My recommendation for beginners is to consider looking for the cheaper ones first. Entry level models price can range from $400 to $700. Cheaper DSLR cameras might not have the performance of a high end model, but can absolutely get the job done.
Get to hang on a cheaper camera first and learn to use it properly until you can master all its features. One must remember that capturing a great image does not depend largely on the camera but from the creativity and skill of the photographer.
Below is my list of the popular cheap DSLR cameras in the market today with their corresponding description from the manufacturer:
Keep in mind that for DSLR cameras, special lenses are necessary for different type of shots such as in Macro shots or Optical Zoom, so your budget will be extended slightly.
You can search the web for more reviews and deals so that it would be easier for you to decide on what to choose.
A Digital Single-Lens Reflex camera, or what we commonly call DSLR, is a type of digital camera that usually has detachable lenses, a reflex mirror, and a digital camera back that replaced the photographic film.
The reflex design scheme is the primary difference between a DSLR and other digital cameras. In the reflex design scheme, light travels through a single lens and a mirror is used to reflect a portion of that light through the viewfinder - hence the name Single Lens Reflex. The image that is seen through the viewfinder is also the image that is captured by the camera's sensor.
Cross-section view of a DSLR. Electronics and display not shown.
- Camera lens
- Reflex mirror
- Focal-plane shutter
- Image sensor
- Matte focusing screen
- Condenser lens
- Pentaprism/pentamirror
- Viewfinder eyepiece
DSLRs have better image quality than the common Point-and-Shoot cameras and allow you to manually adjusts settings before taking a picture. There are hundreds of DSLR cameras in the market today, and the criteria in choosing the best is usually based on lens, sensor, resolution, and speed. But price is also one aspect to consider. You might find models amounting as much as $3,000. That is too expensive for an average user. My recommendation for beginners is to consider looking for the cheaper ones first. Entry level models price can range from $400 to $700. Cheaper DSLR cameras might not have the performance of a high end model, but can absolutely get the job done.
Get to hang on a cheaper camera first and learn to use it properly until you can master all its features. One must remember that capturing a great image does not depend largely on the camera but from the creativity and skill of the photographer.
Below is my list of the popular cheap DSLR cameras in the market today with their corresponding description from the manufacturer:
Nikon D3100
This entry level DSLR camera provides excellent quality and lots of features all amateurs in photography must learn.
This affordable, compact and lightweight digital SLR features a high-resolution 14-megapixel CMOS DX sensor, high-quality 3x NIKKOR 18-55mm VR image stabilization zoom lens and intuitive onboard assistance including the learn-as-you grow Guide Mode.
Capture beautiful pictures and amazing Full HD 1080p movies with sound and full-time autofocus.
Easily capture the action other cameras miss with a fast start up time, split-second shutter release, 3 frames per second shooting and 11-point autofocus.
Detail Page
Another entry-level DSLR camera, the Canon Rebel series has historically been the sweet spot between amateur price but respectable specs. Capture beautiful pictures and amazing Full HD 1080p movies with sound and full-time autofocus.
Easily capture the action other cameras miss with a fast start up time, split-second shutter release, 3 frames per second shooting and 11-point autofocus.
Detail Page
Canon EOS Rebel T3i
The EOS Rebel T3i has an 18.0 Megapixel CMOS (Complementary Metal Oxide Semiconductor) sensor that captures images with exceptional clarity and tonal range and offers more than enough resolution for big enlargements or crops. This first-class sensor features many of the same new technologies as used by professional Canon cameras to maximize each pixel’s light-gathering efficiency. Its APS-C size sensor creates an effective 1.6x field of view (compared to 35mm format).
Canon EOS Rebel T2i brings professional EOS features into an easy to use, lightweight digital SLR that's a joy to use. Featuring a class-leading 18.0-megapixel CMOS image sensor and increased light sensitivity for low light photography, the EOS Rebel T2i also has an advanced HD Movie mode for gorgeous Full HD movies. Able to capture up to 3.7 frames per second, it's ready to go the minute it's picked up. Advanced Live View, a new wide-area screen, plus features like Canon's brilliant Auto Lighting Optimizer and Highlight Tone features ensure brilliant photos and movies, easily. With some of the most advanced features of any digital SLR, it's simply the best Rebel Canon has ever created.
Detail Page


